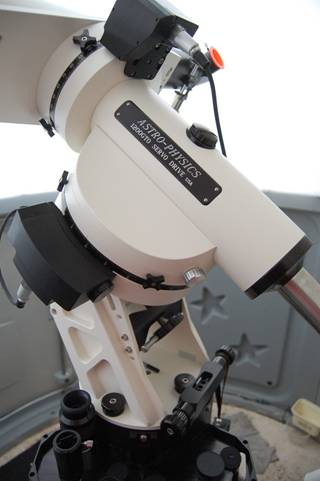
Astro Physics AP1200GTO
Astro Physics are a phenomenon.
The reason, I suspect, is that boss Roland Christen isn’t really in it for the
money. If he was, he wouldn’t have decade-plus waiting lists on his scopes .
However, I don’t know if the reputation
for excellence in optics is deserved, because I have never even seen one of
their scopes, let alone seen through
one. It’s a truly weird situation for a consumer product. Their ordinary scopes
have limited runs and so become instant collectors’ items. Their premium
instruments, made in minute numbers that AP don’t divulge, are offered to
favoured customers and are so rare that they fetch insane prices used: the ten
inch Maksutovs they made a few years back are now worth the sort of money that
would buy a cheap holiday home.
If I sound bitter, it’s because I
am. Not a few AP telescopes get put in safes like gold bars; never used, never
even unpacked. That’s not AP’s fault, but is a bit ridiculous all the same.
Up til recently (and from what I
hear in future), the mounts were a bit like that too. Then a few years ago,
perhaps with the recession biting, maybe because they had upped production, it
became possible to get the mounts at short notice. And they weren’t even
expensive: less than the equivalent Takahashi.
So I bought an AP1200 – the
biggest of the range at that time (AP now make a much bigger mount as well -
the mammoth “El Capitan”).
Design and
Build
I have an AP extension tube, just
a piece of aluminium tubing really, with male and female 2-inch fittings. But
that humble extension tube is way over engineered and contains
precision-engineered knife-edge baffles, and perfect super-matte blacking like
the tube for a premium APO. It shows an obsessive attention to detail that goes
way beyond the profit motive. AP could sell an extension tube like everyone
else’s for the same money. But no, they had to make the best possible extension
tube. The AP1200 is a bit like that.
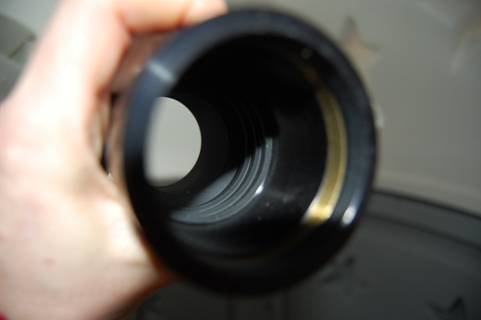
AP extension
tube: more knife edge baffles than some APOs.
In essence the AP1200 is just a
big German equatorial mounting with a built-in GOTO system and a clever way of
splitting the RA axis from the Declination axis on a dovetail. Like the
extension tube, the specialness of the AP1200 is in the detail.
Every component on the AP1200 is
made from the finest materials and carefully designed for purpose. This is hard
to explain, you have to experience it, but I’ll try...
There are no ferrous metals in
the AP1200, so it won’t rust in your observatory. By comparison I could tell
you an eye-watering tale of a used Takahashi EM500 that was for sale and was
breaking out in rust all over, like an old banger.
All the electrical connections on
the AP1200 are mil-spec for ruggedness and the electronics are mil-spec as
well, so the built-in computer will still work at -40 (whereas your PC...
err... won’t).
Every knob is custom milled from
alloy; there is no plastic. Those annodised knobs are works of art, specially
sculptured for ease of use in the cold and dark.
The motor housings are
constructed from CNC’d parts held together by tiny stainless allen screws.
Every knob also contains a hex
socket so you can tighten it with an Allen key (a set of premium Allen keys is
supplied with the mount).
The mount is driven by micro-controlled
servo motors - the best Swiss ones.
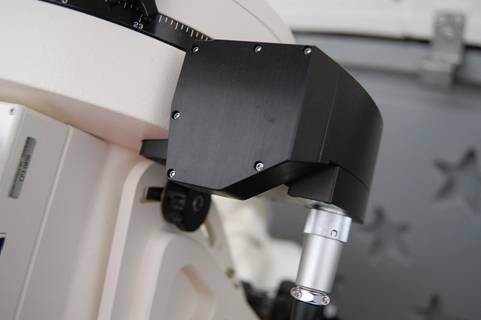
RA servo
motor housing detail. Note the mil-spec connector and tiny stainless Allen
bolts.
The five RA bearings are huge
(9.5” diameter) and so finely balanced that with no load the RA axis will slowly
turn on its own, millimetre by millimetre, due to the slightly bottom-heavy
Dec’ casting; yet try to turn it by hand and it takes surprising force to move
it at all.
The RA gear is ten inches in
diameter and was made by the same company that made gears for those Mars rovers
that (as I write) are still working six years after they should have failed.
Any gears that fail the five arcsecs benchmark are scrapped.
The knob for adjusting the
altitude of the RA axis has a little screw in bar (beautifully milled from
stainless) to help turn it. You can remove the bar after setup to avoid
inadvertent changes to your alignment.
The covers for the polar
alignment ports, front and rear, are some of the most finely machined items
I’ve seen, where everyone else uses plastic plugs.
Make no mistake, the engineering
on the AP1200 is absolutely superb and uncompromising. The only other time
you’ll see engineering at this level is for defence applications (no surprise
that’s Roland’s background).
The result of all that over-engineering
is that the AP1200 is rated for a relatively massive load of 65 Kg. I can’t
comment on that, but it certainly chucks my 7 inch refractor and tube weights
(35 kg) around as if it wasn’t there.
All the other specs reflect the
AP1200s design brief as a premium imaging mount for big scopes, including the
high maximum slewing speed of 1200x siderial (hence the name). Incidentally,
the “GTO” part of the name apparently comes from Roland Christen’s other
passion: Muscle Cars.
Accessories
AP sell a comprehensive range of
accessories for the AP1200 that you may
need: CNC plates, dovetail shoes, dovetail bars and trays. What you definitely will need however, are some
counterweights, a pier and a pier adaptor.
The optional counterweights are
stainless, expensive and come in various sizes, the biggest of which weigh 18
lbs each. The weights are provided with brass sleeves and brass locking pins
that are softer than the shaft and so don’t mark it (more of that attention to
detail).
The standard AP Portable Pier is
held together only by three tensioning bars (so there are no bolts to unscrew).
Broken down, the legs come off to leave the pier in small easily hefted chunks:
it’s simple but it works. A fancier ATS-made pier is available through AP, but not
sure I see the point of this (except it looks vaguely like a rocket).
To fit the mount onto the pier
(any pier) an adapter plate is required. The mount fixes to the plate by four
knobs that are loosened to align the AP1200 in azimuth, so the plate effectively
acts as a bearing surface for the mount to move on.
In Use
Setup
The AP 1200 came in several large
cardboard boxes, protected by Ethafoam. Everything was carefully labelled, even
the screws and bolts were in special labelled packets to avoid confusion (Ikea
take note). So putting the mount together was a doddle.
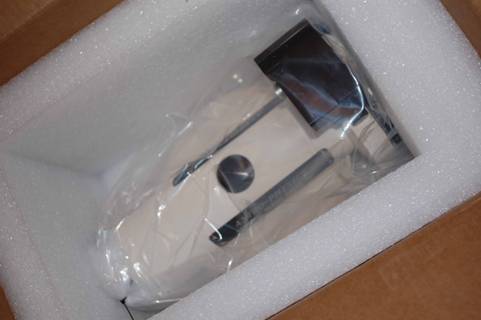
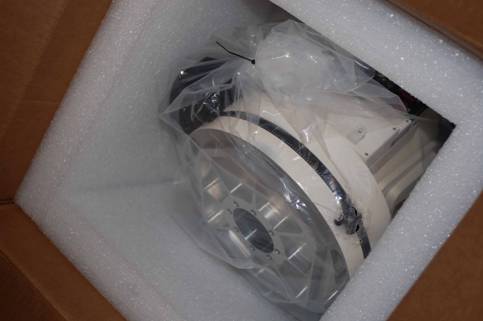
Declination
and RA axes as they came fresh from Astro Physics. You can see the way the
mount splits along a dovetail.
Despite being a heavy duty mount,
the AP1200 is one-man portable because it comes apart in two big sections along
a circular dovetail joint just in front of the RA gear housing. The dovetail is
a clever feature, because it requires no tools to set up: just fit it together
and tighten two knobs. The two halves of the mount, RA and Dec’, weigh 22.7 kg
and 14.1 kg respectively. The only remaining component is the long
counterweight shaft which weighs a whopping 6.4 kg on its own and attaches via
a huge thread (shorter shafts and even extensions are available).
So setup essentially just
involves screwing the adapter plate to the pier top, plonking on the RA
section, attaching the Dec axis via the dovetail and screwing in the
counterweight shaft. After that, it only remains to connect up the electrical
and install the scope and counterweights.
Unlike, say, a big Takahashi
mount, all the electronics to the AP1200 are external. The control unit is a
small (10cm x 10cm x 2cm) box piggybacked on top of the RA axis and held on by
just a couple of set screws. The control box connects to the motors via a
Y-shaped cable with military type bayonet connectors. The handset then connects
to the control box and that’s it.
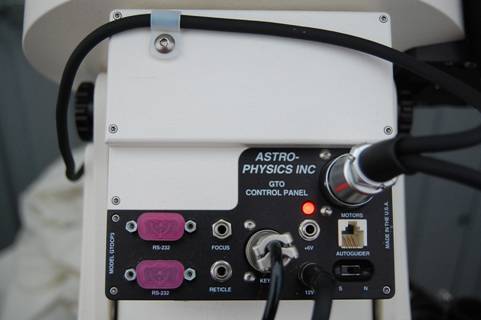
Control box
is separate from the mount, all cabling is external.
(I originally thought that the
external wiring was an inferior aspect of the big AP, but it is in fact a well
thought out feature. If you want to replace or repair or upgrade the control
box, doing so is quick and trivial and future-proof. The mount itself is simple,
rugged and sealed, containing no electronics at all).
The top of the Declination axis
is a wide plate with various threads. You can attach any one of various AP
plates to hold big scopes firmly and orthogonally with centring screws, or
various dovetail plates for more flexible connections. I would strongly
recommend the former, for reasons that I’ll come back to.
Alignment
I’m going to spend some time
talking about alignment. If you intend buying an AP1200, you should read this,
if not you can safely skip it!
If the AP1200 is Zen-simple in
the setup, alignment is where it starts to show its “Fools need not apply”
approach to operations.
Astro Physics don’t supply a
polar scope with the AP1200 (though you can buy one as an accessory). They
point out that by using the alignment routines in the handset your telescope
becomes a super accurate polar-scope... in theory.
The handset has several alignment
functions that use various stars or the pole star to iteratively hone the RA
alignment. These routines are simple in theory, but they can be extremely
frustrating in practice, unless you’ve some experience and have met the
pre-requisites.
The daylight setup routine is a
God-send that saved my sanity when getting started with aligning. You get the
mount and scope roughly pointed north, then level the OTA and counterweight
shaft with a spirit level. This is park position one of three. Then you re-park
in position two and again level the OTA with a spirit level by adjusting the
big knurled knob that changes the RA angle. That gives good rough altitude
alignment, fine for general visual use. I then used a laser pointer resting on
the casting to get an approximate azimuth alignment on Polaris (looking through
the polar finder tunnel is another easy option).
If you want better alignment than
that, things get tough. The problem is a thing called “orthogonality”, which
means everything has to be perfectly square and free from play: OTA, rings,
focuser, plate, dovetail, diagonal and optics. If your orthogonality isn’t
spot-on, the alignment routines just don’t work. Read that again – you’ll thank me when you try this at home...
when it’s late... and dark... and cold... and you’re tired... and you’ve been at
it half the night already.
Now if you’re getting bored, know
this: your scope(s) probably won’t be orthogonal enough to align an AP1200;
mine weren’t. I tried (over the course of many frustrating hours)
various high end refractors attached to a Losmandy plate and APs own dovetail
before realising that a dovetail just isn’t accurate enough for the job. What’s
more, many fine scopes (like Takahashi’s, for example) won’t work because there
is too much play in the focuser and the holes for mounting the tube rings.
What is required is a scope with
a CNC tube and rings that directly fit onto one of APs own plates, because then
everything aligns perfectly with centring screws that permit no play. After that, all you need is a focuser with
zero image shift and a reticle eyepiece!
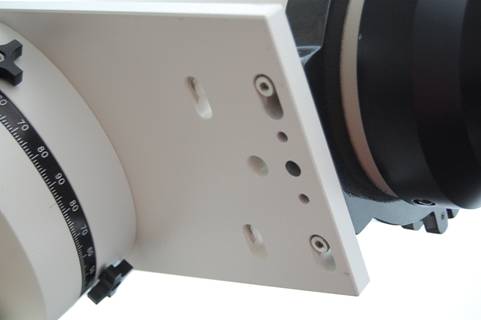
AP’s own
plate with rings directly attached via recessed self-centring screws.
I couldn’t use the TMB 175 for
alignment, even though it’s all CNC, because it’s just too long to allow the
mount to slew it around uninterrupted (as it has to when following the
alignment routines). The problem comes if you have to stop the slewing during
the routine (if there’s a risk of hitting the dome, for example): do that and
you have to start from the spirit level again. So I ended up buying a Skywatcher
ED120 just to align the mount. The ED120 is all CNC and the rings (oddly
enough, I thought) have AP-pattern mounting holes.
The
Skywatcher ED120 makes a great alignment scope: CNC tube and focuser, with CNC
rings that bolt straight on the AP plate.
Of the alignment routines, the
one I found best was the one that simulates drift alignment. This works by
selecting a star near the meridian and hitting GOTO. You then set the scope
precisely onto that star by loosening the RA and Dec’ clamps and moving the
scope manually. Having done that, you tighten the clamps again and trick the
mount by moving its understanding of the Meridian a couple of hours (there’s a
menu option to do this). Now if you hit GOTO again, the mount swaps the
telescope onto the other side of the mount, but hopefully pointing near the
same star. You can now adjust the actual mount alignment, in the way you adjust
most German equatorials, by turning the altitude and azimuth knobs (it’s
probably best to loosen the locknuts first, tighten them again afterwards). Do
this several times and you gradually get better and better alignment (or worse
and worse alignment if your orthogonality is out).
All in all I tried for several
nights and many hours before getting the hang of aligning the AP1200 and a
frustrating business it was. The manual has muddy boot marks all over it to
prove that by the end I was so frayed I didn’t even notice treading on it in
the dark. The problem is neither the mount, nor the manual (which is well
written and clear, unlike that for a Tak’ mount). It simply requires
experience, practice, accuracy and that all important über-orthogonality to get
the process right.
Tellingly, the routine Roland
uses and recommends is proper drift alignment that requires a CCD camera with a
“track and accumulate” mode (which I don’t have).
When aligning the AP1200 I recommend purchase
of a polar scope, or lots of patience (or Valium).
Handset
The handset is a built-in GOTO computer;
no external PC is required. It is ruggedly made and has a rubber shroud like a
big iPod case. As I said before it is rated down to -40 °C and I have
personally used it down to -15 without problems. The handset has large, chunky
buttons (good for cold hands), all of which are lit when the mount is powered
and have built-in luminescence for when it’s not. The display is an
old-fashioned four-line vacuum display with variable brightness. Why? Because
obviously (says Roland, irritably) a
graphics LCD would fail under extreme conditions.
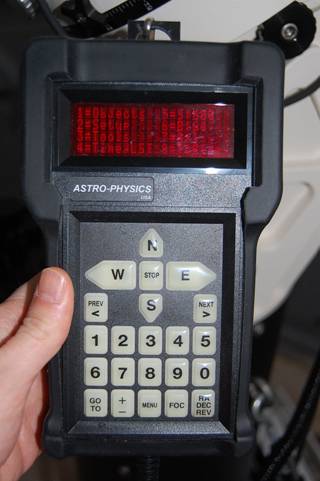
The handset
showing the root menus. Options 5 & 6 are the GOTO and manual slewing
speeds
(set to 600x
and 64x sidereal, respectively).
The handset is not as user friendly
on first acquaintance as some, but (of course) it works very well indeed once
you’re used to it. The interface is simple, with various selectable numbered
menu items at each level (you use the “Menu” key to go back up a level). In
some cases repeated selection toggles through various possible values (e.g.
selecting “6” toggles through all the possible manual slewing speeds from 1200
to 0.25).
GOTO options include a high level
“Objects” menu (option “1” above) that contains a huge array of sub-menus to
select what you want to look at in various ways. Quick menus are provided for
the Solar System and Stars, or you can choose a “What’s Up Now” random tour
option or a very handy feature that tells you what objects are available in the
constellation you’re looking at (or any other).
Other menus do things like:
·
Park
the mount (three different positions).
·
Change
the GOTO slewing speed between 600x and 1200x.
·
Changing
the tracking speed from Siderial to Lunar or Solar (option “8” in the picture
above).
·
Look
up or set the time and location (various locations can be stored and selected).
·
Use
a timer for photo exposures – very handy, it beeps when you’re done.
·
Change
the Meridian position to fool the mount into staying on one side or the other –
incredibly handy when imaging or if you are tight for space and you don’t want
the scope to swap sides.
·
Set
movement limits to take into account your pier or tripod, or your horizon.
·
Various
possibilities for recording or using PEC (Periodic Error Correction) that I haven’t
tried because I can’t take exposures long enough to need it with my DSLR.
The key to using the handset is to understand
that it is designed with rapid operation as paramount (no irony intended!). Ease of learning is sacrificed somewhat to
ultimate speed and efficiency. But that doesn’t mean that it’s unclear or
illogical, it’s not, just don’t expect too much excess friendliness (e.g. the
Solar System menu is simply labelled “Sol” for brevity). Think “UNIX” not
“Windows”.
There are none of those infuriating
Meade-style warning messages, unless you GOTO the Sun, or something near it.
The handset can be configured for a permanent location so that it goes straight
to the main menu on startup. Boot-up is a
fraction of a second, so you can be going to your first object three key clicks
and a few seconds from powering up the mount.
The only real gotcha I found is
that hitting the “next >” key twice re-syncs the mount and it’s right next
to the big “E” slewing button! Make that mistake whilst also using the meridian
delay and it’s back to the spirit level – not a good experience at 2:00 a.m.
Pointing and Tracking
Once you’ve aligned it and
learned to use it, the AP1200 is a fantastic tool for visual or imaging use. Slewing
is very quick and precise, objects are held stably and accurately enough for
imaging at very high magnification (for example when using a webcam).
Vibrations are very efficiently damped, even using the portable pier and a big
OTA like the TMB 175. The vast range of slewing speeds is very useful when
doing imaging. The tracking is almost inaudible and the slewing very quiet.
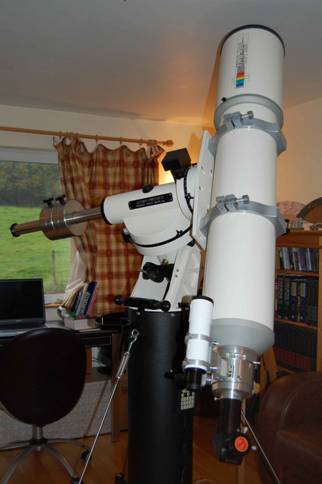
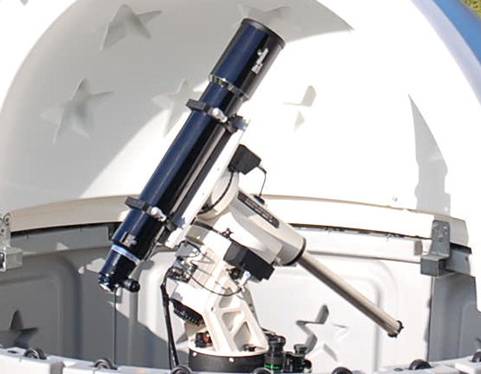
The AP1200
with TMB175 mounted. This is actually a light load for the mount, with just two
counterweights in use.
One of many good things about
having a mount capable of such big loads is that you can pile extra stuff on it
without worry. I have cobbled up a tube counterweight for the TMB 175 (that
lens is very heavy) which weighs about 10kg – the AP1200 takes the extra without
trouble and I’ve plenty more capacity to spare for guide scope, camera etc.
I found GOTO pointing accuracy
good enough to put target objects reliably in a ~ 1 ° field anywhere in the
sky. AP claim pointing accuracy to 1 minute, but I have never achieved this,
probably because my alignment is still not quite perfect. Even so, this means
you can discard your finder unless your scope has a focal length of well over
two metres.
In practice, it is very easy to
just GOTO from one object to the next, imaging in quick succession without
changing focus. Another advantage is the ability to focus accurately on a
bright star and then GOTO a much fainter object and image it directly.
I have used the AP1200 in very
cold conditions (very damp, foggy ones too) and it has never behaved any
differently from when the conditions are ideal.
Control Box Problem
I did have a problem with my
AP1200 very early in our relationship. The mount just stopped tracking one day
after just a few hours of overall use. It eventually turned out to be a dry
soldered joint in the control box (AP use lead free solder these days), but the
box had to be returned to AP to fix it (for free, and I only had to pay
shipping one way). I should point out that AP arranged a conference call with
the engineers very early on and were very efficient, friendly and helpful in
diagnosing the problem.
Summary
I suspect I know Roland Christen
from his brain child, the AP1200. If I’m right, Roland is clever,
uncompromising, perfectionist to the point of mania and probably doesn’t suffer
fools gladly. I’m glad Roland is like that, because if he weren’t the AP1200
probably wouldn’t exist. For the AP1200 is a superb and obsessively refined
product that exhibits exquisite design and workmanship.
I can’t pinpoint any real
weaknesses in the AP1200, apart from that dry soldered joint and the odd
suspected software glitch. Once aligned it does exactly what it is supposed to
do, does it reliably and swiftly and quietly and is very easy to use
efficiently. The design is very, very well thought through. Personally, now
that I’m used to it, I wouldn’t be
willing to swap the quick-start brevity of the handset for a more user-friendly
interface.
However, excellent though it is, the AP1200
is emphatically not a mount for a beginner. Don’t buy this before you have some
experience in astronomy. Saying that
may sound dismissive, but I mean it sincerely: the AP1200 could easily put a
novice off this hobby, because it requires considerable skill, patience and
experience to align it properly. It gave me enough trouble before I learned to
do it and I’ve had many mounts before, know my Meridian from my Zenith and have
worked with computers for many years. When I put this to a major seller of AP
mounts in Europe, he laughed and told me he reckons there are many AP1200s out
there whose owners can’t align them; sad if true.
If you can get your head around the alignment
routines and the initially rather terse and unfriendly computer interface, the AP1200
is a peerless tool for both high-power observing and critical imaging.
The AP1200 is very highly
recommended, but absolutely not for novices.